今回紹介する手法で、だいたいの分割パターンに対応できると思います。
交差検証をする理由
機械学習モデルを作るとき、データを入れてfitなどしますが、
モデルはこのときに入れたデータと答えが対応するように学習します。
ですが実際に機械学習モデルが予測するのは、学習時に使っていない未知のデータです。
なので、モデルの性能を評価する際は、学習に使っていない未知のデータを使いましょう。
交差検証でよく使うデータ分割法4選
train_test_split
from sklearn.datasets import load_breast_cancer
import pandas as pd
data = load_breast_cancer()
df = pd.DataFrame(data["data"], columns = data["feature_names"])
df["target"] = data["target"]
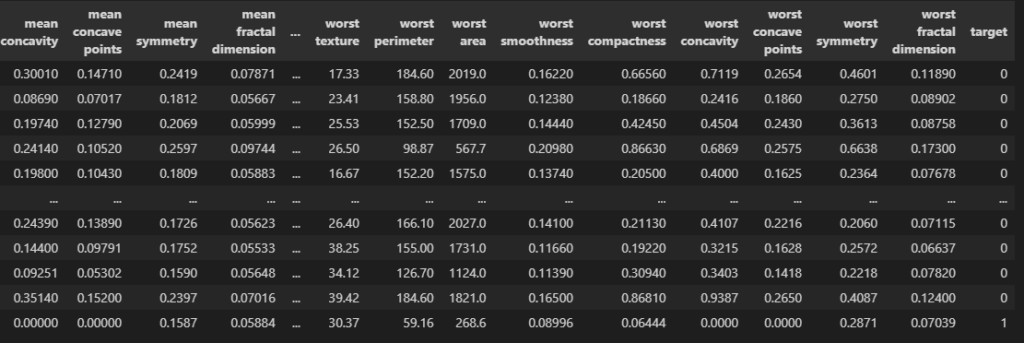
df
このデータを分割しましょう。
from sklearn.model_selection import train_test_split
train, test = train_test_split(df)
print(df.shape)
print(train.shape, test.shape)
test.head()

# ========== outputs ==========
# (569, 31)
# (426, 31) (143, 31)
“train_test_split”をインポートして、()の中にデータを入れます。
trainが学習データ、testが検証データです。
検証データを表示しました。インデックスを見ると408, 116, …とランダムになっていますね。
shuffle
train, test = train_test_split(df, shuffle = False)
print(df.shape)
print(train.shape, test.shape)
test.head()

# ========== outputs ==========
# (569, 31)
# (426, 31) (143, 31)
“shuffle = False”にするとシャッフルしません。
test_size
train, test = train_test_split(df, test_size = 0.1)
print(df.shape)
print(train.shape, test.shape)
test.head()

# ========== outputs ==========
# (569, 31)
# (512, 31) (57, 31)
“test_size”で検証データのサイズを設定できます。0.1にすると10%が割り当てられます。
stratify
train, test = train_test_split(df, stratify = df["target"])
print(train["target"].value_counts())
print(test["target"].value_counts())

# ========== outputs ==========
# 1    267
# 0    159

# 1    90
# 0    53
“stratify”で指定したデータを偏りなく分割することができます。
上記なら”target”には0,1のデータが入っており、
学習データでも検証データでもその比率が9:5くらいになっていますね。
ただし、連続した数値を予測する回帰モデルではstratifyは不要です。
まとめ
train, test = train_test_split(df, test_size = 0.1, shuffle = True, random_state = 0, stratify = df["target"])
print(df.shape)
print(train.shape, test.shape)

# ========== outputs ==========
# (569, 31)
# (512, 31) (57, 31)“random_state”を設定しないと、実行のたびに違うデータが検証用になって再現性がなくなります。
KFold
from sklearn.datasets import load_diabetes
import pandas as pd
data = load_diabetes()
df = pd.DataFrame(data["data"], columns = data["feature_names"])
df["target"] = data["target"]
このデータを使います。回帰モデルで予測するデータです。
from sklearn.model_selection import KFold
kf = KFold(n_splits = 5)
for train_idx, test_idx in kf.split(df):
    print(len(test_idx), test_idx[:5])

# ========== outputs ==========
# 89 [0 1 2 3 4]
# 89 [89 90 91 92 93]
# 88 [178 179 180 181 182]
# 88 [266 267 268 269 270]
# 88 [354 355 356 357 358]
“KFold”をインポートして、変数kfとして呼び出しました。
n_splitsの数だけデータを分割してくれます。
上記のようにKFoldはfor文と組み合わせて使用されることが多いです。
それぞれの分割で、”valid_idx”のインデックス番号が検証データに割り当てられています。
kf = KFold(n_splits = 5)
for train_idx, test_idx in kf.split(df):
    train = df.iloc[train_idx]
    test = df.iloc[test_idx]
    print(train.shape, test.shape)

# ========== outputs ==========
# (353, 11) (89, 11)
# (353, 11) (89, 11)
# (354, 11) (88, 11)
# (354, 11) (88, 11)
# (354, 11) (88, 11)
pandasと組み合わせる場合は、このように”iloc”でインデックス番号を渡しましょう。
するとfor文の各実行で、それぞれ学習データと検証データを指定することができます。
kf = KFold(n_splits = 5, shuffle = True, random_state = 0)
for train_idx, test_idx in kf.split(df):
    train = df.iloc[train_idx]
    test = df.iloc[test_idx]
    print(train.shape, test.shape)

# ========== outputs ==========
# (353, 11) (89, 11)
# (353, 11) (89, 11)
# (354, 11) (88, 11)
# (354, 11) (88, 11)
# (354, 11) (88, 11)StratifiedKFold
from sklearn.datasets import load_breast_cancer
import pandas as pd
data = load_breast_cancer()
df = pd.DataFrame(data["data"], columns = data["feature_names"])
df["target"] = data["target"]
このデータを使います。”train_test_split”のときと同じものです。
from sklearn.model_selection import StratifiedKFold
skf = StratifiedKFold(n_splits = 5)
for train_idx, test_idx in skf.split(df, y = df["target"]):
    train = df.iloc[train_idx]
    test = df.iloc[test_idx]
    print(train.shape, test.shape)
    print(test["target"].value_counts())

# ========== outputs ==========
# (455, 31) (114, 31)
# 1    71
# 0    43
# (455, 31) (114, 31)
# 1    71
# 0    43
# (455, 31) (114, 31)
# 1    72
# 0    42
# (455, 31) (114, 31)
# 1    72
# 0    42
# (456, 31) (113, 31)
# 1    71
# 0    42
“StratifiedKFold”は”train_test_split”のstratifyで設定したように、
指定したデータに偏りが内容に分割してくれます。
分類系のタスクでほぼ確実に使用される手法です。
skf = StratifiedKFold(n_splits = 5, shuffle = True, random_state = 0)
for train_idx, test_idx in skf.split(df, y = df["target"]):
    train = df.iloc[train_idx]
    test = df.iloc[test_idx]
    print(train.shape, test.shape)
    print(test["target"].value_counts())
こんな感じでシャッフルして使うこともできます。デフォルトではシャッフルされません。
GroupKFold
from sklearn.datasets import load_diabetes
import pandas as pd
import random
data = load_diabetes()
df = pd.DataFrame(data["data"], columns = data["feature_names"])
df["target"] = data["target"]
df["group"] = [random.randint(0, 5) for _ in range(len(df))]

print(df["group"].value_counts())
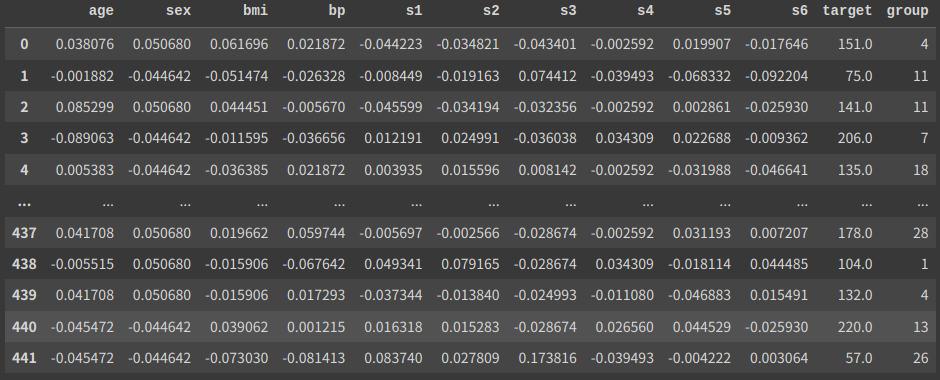
df

# ========== outputs ==========
# 0    89
# 2    79
# 3    73
# 4    71
# 1    67
# 5    63
適当に乱数を振り分けて、右端に”goup”列を作りました。
このようにグループを持つデータを扱うことがたまにあります。
例えば医療系データで、同じ患者から取得したデータが複数列あり、
推論時では新規患者のデータしか取り扱わない場合です。
from sklearn.model_selection import GroupKFold
kf = GroupKFold(n_splits = 5)
for train_idx, test_idx in kf.split(df, groups = df["group"]):
    train = df.iloc[train_idx]
    test = df.iloc[test_idx]
    print(test["group"].unique())

# ========== outputs ==========
# [21 12 13  9 30 29]
# [11 16 14 28 27 10  5]
# [ 4 18 26 20 19 22]
# [ 7  0 25 23  1  2]
# [17 24  3  6  8 15]
“GroupKFold”を使うと、このように学習データと検証データとでグループの重複がなくなります。
GroupKFoldではシャッフルできません。
ちなみにGroupKFoldとStratifiedKFoldを合わせた、StratifiedGroupKFoldもあります。
まとめ
今回は交差検証でよく使う手法を紹介しました。
ここで紹介した4つでだいたいはカバーできるはずです。
最初はなんとなくわかる程度て大丈夫なので、実践的なデータで練習してみましょう。


コメント