

TPUを使えばTensorFlowの学習を高速化できます。
今回は、TPUを使って画像分類モデルの学習を高速化する方法を解説します。
基本的には以下の記事にあるコードを使っていますので、
わからなくなったら読んでみてください。
>>Tensorflow(Keras)で画像分類モデルを作る方法
TPUを使用する方法
TPUをONにする
まずはTPUをONにしましょう。
使える環境がない方はGoogle Colaboratoryを利用すればOKです。
>>Google Colaboratoryの使い方
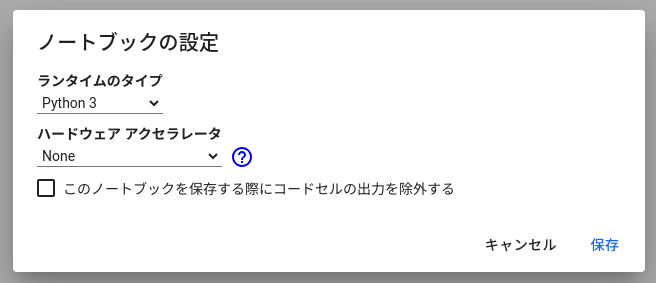
“ノートブックの設定”からアクセラレータをTPUにします。
TPU使用状況の確認
以下のコードでTPUが使えているかをチェックしましょう。
import tensorflow as tf
try:
    # TPU detection. No parameters necessary if TPU_NAME environment variable is
    # set: this is always the case on Kaggle.
    tpu = tf.distribute.cluster_resolver.TPUClusterResolver()
    print('Running on TPU', tpu.master())
except ValueError:
    tpu = None

if tpu:
    tf.config.experimental_connect_to_cluster(tpu)
    tf.tpu.experimental.initialize_tpu_system(tpu)
    strategy = tf.distribute.TPUStrategy(tpu)
else:
    # Default distribution strategy in Tensorflow. Works on CPU and single GPU.
    strategy = tf.distribute.get_strategy()

REPLICAS = strategy.num_replicas_in_sync
print("REPLICAS:", REPLICAS)

# ========== output ==========
# Running on TPU ...
# REPLICAS: 8もしTPUが使用可能なら、“tpu”がTrueになり、”REPLICAS”が1よりも大きくなっています。
1だったらCPUかGPUで計算していることになります。
TPUとGPUの速度比較
画像分類のコード
冒頭で紹介した過去の記事にある画像分類モデルを使います。
CIFAR10というデータセットにある10種類の画像を分類しています。
# =============================================
# REPLICASの分だけバッチサイズを大きくできる→高速化
BATCH_SIZE = 32 * REPLICAS
# =============================================
# データのダウンロード
(X_train, y_train), (X_test, y_test) = tf.keras.datasets.cifar10.load_data()
# データセット作成
def augmentation(image, label):
image = tf.image.random_flip_left_right(image) # 左右反転
image = tf.image.random_flip_up_down(image) # 上下反転
return image, label
train_dataset = tf.data.Dataset.from_tensor_slices((X_train, y_train))
test_dataset = tf.data.Dataset.from_tensor_slices((X_test, y_test))
train_dataset = train_dataset.batch(BATCH_SIZE)
test_dataset = test_dataset.batch(BATCH_SIZE)
train_dataset = train_dataset.shuffle(1024 * 50)
# モデル定義
!pip install -q tfimm timm
import tfimm
[m for m in tfimm.list_models() if "swin" in m]
import tensorflow.keras.layers as L
import tensorflow.keras.models as M
def get_model(image_size, num_classes):
inputs = L.Input(shape = image_size)
x = tfimm.create_model(
"efficientnet_b0", pretrained = True, nb_classes = 0
)(inputs)
x = L.Flatten()(x)
outputs = L.Dense(units = num_classes, activation = "softmax")(x)
model = M.Model(inputs = inputs, outputs = outputs)
model.compile(
optimizer = tf.keras.optimizers.Adam(learning_rate = 5e-5),
loss = "sparse_categorical_crossentropy"
)
return model
# モデルの呼び出し
tf.keras.backend.clear_session()
model = get_model(X_train.shape[-3:], 10)
# 学習と検証
checkpoint = tf.keras.callbacks.ModelCheckpoint(
"best_weight.h5", # ファイル名
monitor = "val_loss", # 参照するloss
mode = "min", # monitorが最小のときに保存
save_best_only = True,
save_weights_only = True
)
history = model.fit(
train_dataset,
validation_data = test_dataset,
epochs = 15,
callbacks = [checkpoint]
)
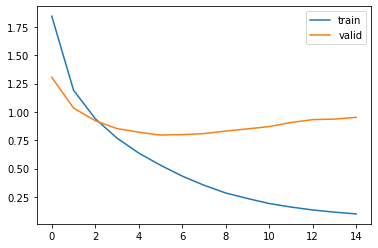
# loss確認
import matplotlib.pyplot as plt
plt.plot(history.history["loss"], label = "train")
plt.plot(history.history["val_loss"], label = "valid")
plt.legend()
plt.show()
# 予測と精度確認
from sklearn.metrics import accuracy_score
model.load_weights("best_weight.h5")
preds = model.predict(test_dataset)
pred_labels = preds.argmax(axis = 1)
print(accuracy_score(pred_labels, y_test.reshape(-1)))重要なのはバッチサイズで、”REPLICAS”の値だけ大きくできます。
CPU, GPUなら”REPLICAS”が1なので、上記コードなら32のままです。
一方、TPUなら32 x 8に設定でき、それだけ分割数が小さくなり、計算も早くなります。
実際にGPUまたはTPUを使ったときの学習時間を見てみましょう。
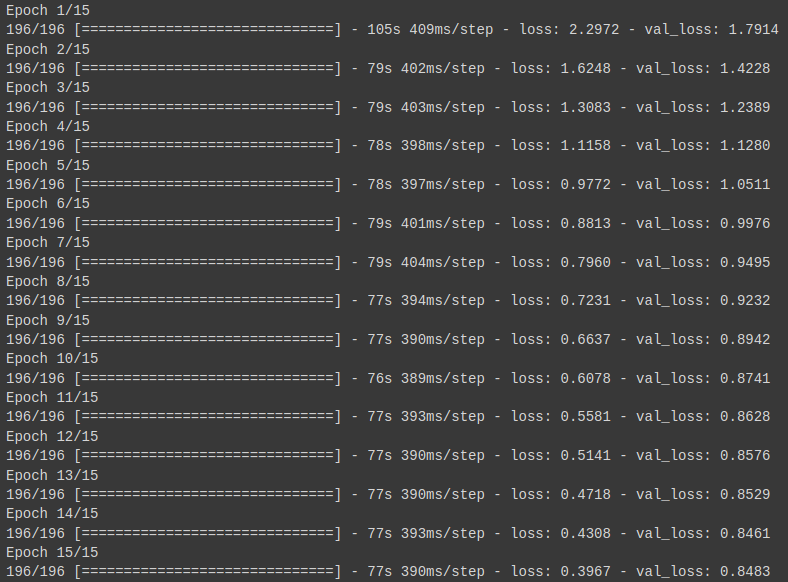
GPUの計算速度

Google Colaboratoryで使用できるGPU(Tesla T4)での計算結果です。
1epochで80秒と少しの時間がかかっていますね。
TPUの計算速度
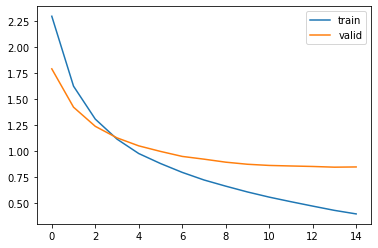
Google ColaboratoryのTPUを使用しました。
1epochだいたい80秒を切るくらいですね。
ただしlossが落ちきっていないので、学習率も変えておくべきだったかもしれません。
当然バージョンが高いほど性能が良いです。
なので、コンペで計算を高速化したいならKaggleのTPUを優先するといいですね。
順番待ちが辛いときにGoogle Colaboratoryの使用を検討しましょう。
まとめ
TensorFlowでTPUを使う方法を解説しました。
今回の結果では若干の高速化しかできませんでしたが、タスクによっては大きな時間短縮になります。
ぜひ使えるようになっておきたいですね。


コメント